 Edit 30/12/2013: 12 things to do after installing Linux Mint 16 (Petra) XFCE is now available here.
Since I did my last post on stuff to do after installing Linux Mint 14 XFCE, two things have become obvious. First of all, I needed to set up a new blog for this sort of stuff, because Dikkii’s Diatribe wasn’t really an appropriate venue for this.
But secondly, my ageing ASUS EeePC 1008HA Seashell finally gave out and I went about getting a replacement. I ended up settling on the ASUS x202e Vivobook – the US version, which is the Core i3 powered version. For whatever reason, the version of this that we get in Australia is the Celeron powered version.
I actually think that I may have settled on the exact right sized laptop PC. This is 11.6, making a large netbook, but absolutely portable in all the right circumstances. Of course, it came with Windows 8 installed, but I immediately went about putting Linux Mint on.
It reminds me that one day, I really should do a post about installation itself – it’s reasonably easy, but there are a couple of tricks.
And there are a couple of great new things in Mint 15. The new menu, for example, is great, and I don’t think that I’ll bother installing MintMenu this time around.
Here’s a few things that I think should be done immediately after installation.
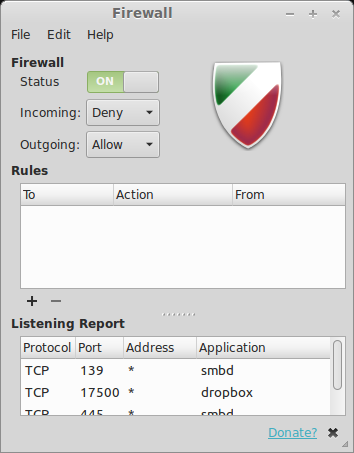
1. Turn the firewall on
The new menu in Linux Mint makes searching for applications a breeze. As soon as I had things up and running, I just did a search for “firewall” and UFW (“Firewall Configuration”) came up as an option immediately. Unlock, switch on and exit.
On to the next step.
2. Change software sources
This should be done next. Simply go to the Menu, run your mouse up to Settings and select ‘Software Sources’.
The main feature of this, is that you can select the software server closest to you for fast updating, or in the case of a cheapskate like me, cheap updating: My ISP houses a considerable amount of stuff in a “free zone” which doesn’t add to my download limit, and a Linux Mint update mirror is one of these.
The Software Sources screen has had some changes in Linux Mint 15. You should be in the Official repositories tab. Under ‘Mirrors’, I recommend that you select your ISP from both the Main and the Base options if available, however, if you are on an unlimited plan, consider utilising the speed rating system that has just been installed and selecting fast mirrors. You won’t regret this.

I also like to select the tickbox for backported packages (under ‘Optional components’), which is left blank by default.
Before exiting, click on the ‘Update the cache’ button in the top right hand corner. It should automatically update and tell you that you need to run an update.
3. Run an update
You can access your update manager from the Menu, under the ‘System’ submenu.
Alternatively, if you go to the systray area near the clock on the bottom right (the taskbar is called the panel in XFCE), you’ll see a little shield shaped thing with a blue exclamation mark. Click on that.
Run your update and have a break for a cup of tea.
4. Sync Firefox and move your files back
Same thing if you use Chromium/Chrome or another browser, you’ll be looking to have your bookmarks and stuff back. We’ll deal with installation of Chromium/Chrome later, but get Firefox sorted now. You should already be using Firefox Sync, which is available in your Firefox Preferences, in the Sync tab. It makes the process wicked fast if you have Firefox installed somewhere else, rather than relying on the Firefox sync key.
Your old files should be moved back at this point as well. This would include your old emails which you might move back if you insist on using an email client. I don’t use one of these. I’m happy enough to go through my browser.
Your files may take a little while, but you should be able to work on other stuff while this progresses.
Lastly, I recommend getting your privacy under control in Firefox. I’m planning on updating this soon, but in the meantime, you can read about what you can do to improve your browser privacy here.
5. Install your cloud memory
I use as much cloud space as I can find, but in the wake of PRISM, I’m being careful about what I store where. Fortunately, I’ve never used SkyDrive and Google Drive remains inconvenient for Linux users. Given the PRISM revelations, I probably will never use it in a big way, even if a decent Linux client is made available.
My current preferred provider is SpiderOak which is where I keep my ’emergency files’, but I also use Dropbox, Ubuntu One, and Copy. So let’s get to work on installing them.
Edit 4 August 2013: Reader dstoler pointed out to me that it wasn’t really clear that you can start with quite different amounts as standard with these different providers. I’ve attempted to fix this with some quick “NB” footnotes throughout. Thanks dstoler!
Edit 5 May 2014: As can be seen at (e), below, Google Drive is a little more convenient for Linux users now that Insync is available.
(a) SpiderOak
I mentioned in my previous post about privacy that SpiderOak does front-end encryption to ensure that your privacy is maximised.
SpiderOak should be installed from here. (NB: 2GB is standard, but you can pay for more, or refer like I do)
(Disclosure: If you click on this link, you get an extra gigabyte of storage data, and so do I. Looks like this offer tops out at 10 GB, so I get no more. But still a good deal.)
If you already are set up to use SpiderOak, just go straight to the Download page. Important – for Linux Mint 15 XFCE, be sure to select the Linux OS 64-bit Debian based version.
You should be right from here.
(b) Ubuntu One
If you’re not already an Ubuntu One user, you’ll get 5 GB free when you start an account. Do you want an extra 500 MB? If you do, click here. (Disclosure: I will also get 500 MB if you click there) (NB: You can pay for more, or refer like I do)
For all users, new or otherwise: Do not install this from the Software Manager. Run this from the terminal instead:
sudo apt-get install ubuntuone-control-panel-qt
You can run this from Settings in the menu. Get this set up now. It will take you through the steps.
This won’t install the indicator in the tray, which is a really cool cloud shaped icon. You don’t actually need it, but it’s cool to have.
WARNING ON THIS STEP: There is a problem with the repositories, though currently. Installing the indicator hasn’t worked for me for a little while and maybe for a few people, as evidenced by this bug report. If you want to risk it, you can use these commands in the terminal to get these up and running:
sudo add-apt-repository ppa:rye/ubuntuone-extras
sudo apt-get update && sudo apt-get install indicator-ubuntuone
Log out and log back in again. Presuming that this is back up and running, you should see a cloud-shaped indicator in the tray. If you get an error, it might be best to go into Software Sources and disable the ryeone-extras repositories.
Search for Ubuntu One in your menu and get it set up. Next is Dropbox.
Edit 11/04/2014: Canonical have shut Ubuntu One down. Very disappointing. You may be interested in Insync, below at (e).
(c) Dropbox
Not yet a user of Dropbox? Here’s your chance. Sign up here and (disclosure) you and I (apparently – this link hasn’t been working for me, so I hope it works for you!) both get 500 MB each extra, up to 16 GB! (NB: 2 GB is standard, but you can pay for more, or refer, like I do)
There isn’t a version of Dropbox that is integrated with Thunar (XFCE’s default file manager) yet, so my suggestion is to go straight to Dropbox’ website and download the .deb file instead. It’s available here:
https://www.dropbox.com/install
I recommend the 64-bit Ubuntu .deb file.
Search for Dropbox in your menu and log in. You are done.
(d) Copy
Copy has a name that makes it a bitch to search for online. Nevertheless, at a whopping 15GB of data as standard (i.e. free) with an additional 2GB free for knocking out a tweet about it, this is wonderful stuff. (NB: You can pay for more, but frankly, it’s so easy to get your hands on huge amounts of space with Copy, why would you?)
Download the archive for Copy from here:
Double click on the archive and it should open up in Archive Manager. I recommend extracting the entire contents to your Downloads folder.
If you haven’t already signed up as a Copy user, click here and get an additional 5 GB (!!) of extra space. (Disclosure: I too, will get that also rather large 5 GB extra)
Navigate into the folder that you extracted the archive into, and into the x86_64 folder inside that and run the CopyAgent file. You should, again, be good to go from here.
Lastly, I recommend logging out and then back in again.
Edit 4/05/2014.
(e) Google Drive via Insync
I don’t use Google Drive for much, but there are an increasing number of people who will share stuff with you via this device.
And while there isn’t an official client for Google Drive for Linux, there is Insync.
Insync costs about $15 for one licence, however you (Disclosure: And me too) can get 15 extra trial days by clicking on this link and downloading the Insync client.
If you don’t already have a Google account, you’ll need one of those too.
End of edit.
6. Anti-virus, anti-malware and anti-rootkit
You need these. Don’t let anyone convince you that Linux is completely safe. Unfortunately, there does seem to be an all-pervasive bulletproof attitude to viruses from many Linux users and as a result, there are not many anti-virus or anti-malware solutions for Linux.
There really is nothing proper for Linux systems and it will probably take a disaster before something does come along. In the meantime, however, some laugh off even reasonably well thought out applications.
ClamTK is a case in point. Why? It’s a good viruschecker, however it really only looks for what could be a threat to Windows systems. Is that a bad thing? I would think not. Especially if you are dual-booting, or swapping media between Linux and Windows systems.
Edit 22 October 2013: If you want to see how the bulletproof attitude that I referred to above manifests itself, check out what is presently comment #27 below. A more balanced view on viruses and Linux may be found here.
The transition from 32-bit to 64-bit computing has also caught a few people out too, with things like AVG or Avast for Linux disappearing in the process.
There doesn’t appear to be a single dedicated anti-malware/spyware application for Linux that I have been able to find, yet. This is sad.
Finally, for anti-rootkits, there are two terrific options: rkhunter and chkrootkit.
Install this from the Software Manager, or type this into a terminal:
sudo apt-get install clamtk chkrootkit rkhunter
It’s worth doing a scan after this. And frequently afterwards, of course. But as I alluded to above, you have to stay vigilant. If better protection becomes available, go for it.
7. Add Medibuntu repositories
The Medibuntu repositories don’t appear to be standard in Linux Mint 15 XFCE. So we’ll have to add these. You can access the Medibuntu repositories here:
http://www.medibuntu.org/repository.php
Follow the directions on the page, but not all of them – the last command on the page will remove non-free software and this could catch you out.
I’ll be changing my mirror to the New Caledonia one – it’ll be closer and therefore faster for anyone in Australia than the main mirror, which is in Europe, somewhere. The instructions on how to do this are on the page, but this is slightly easier for Linux Mint 15 XFCE users:
sudo gedit /etc/apt/sources.list.d/medibuntu.list
Then, in the document that is open, replace all instances of this text:
With this:
Where ‘nc’ is for New Caledonia. Germany (de), France (fr) and Korea (kr) are also available.
Finish up by running:
sudo apt-get update
from your terminal. Done!
Edit 22 October 2013: The Medibuntu repositories are no longer being maintained. So skip over this bit and go to step 8.
8. Configure XScreenSaver
XScreenSaver is back! No idea why they switched to GNOME Screensaver for the last version, but good sense has obviously prevailed.
I’m also going to do my usual thing of installing Electric Sheep and fitting it to work in XScreenSaver as well. Paste this into your terminal:
sudo apt-get install xscreensaver-gl xscreensaver-gl-extra xscreensaver-data-extra xscreensaver-screensaver-bsod electricsheep
And then you will need to follow the steps contained here to install Electric Sheep in XScreenSaver. Key this into your terminal:
sudo gedit ~/.xscreensaver
At the bottom of the file, you’ll see lines that look a little like this:
GL: photopile -root \n\
GL: skytentacles -root \n\
GL: rubikblocks -root \n\
Insert this line in directly after it. Don’t worry about insterting any spaces:
GL: electricsheep –root 1 \n\
And that’s it: You’re done.
Edit 2 August 2013: Reader ergon has pointed out something very interesting. The 32-bit version of Linux Mint 15 XFCE appears to have GNOME Screensaver, rather than XScreenSaver. Which means, if you’re running the 32-bit version, that you will need to do the following BEFORE you run the command above:
sudo apt-get remove gnome-screensaver
followed by
sudo apt-get install xscreensaver
You may also need to run this at the end:
sudo apt-get autoremove
[End of edit]
9. Install Faenza icons
I have been largely unimpressed with the default icons that came as standard in the last couple of versions of Mint XFCE. So I’m resorting to the rather spiffy, yet still pretty conservative Faenza icon set. Strangely, a few of the apps use Faenza within them, already.
Plug this into your terminal:
sudo apt-get install mate-icon-theme-faenza
You can select the new icons from the Appearance option of what is labelled your Settings Manager in the menu.
10. Chromium/Chrome
Chromium is available in the Software Manager, and is worth installing. Chromium is the open source base for Google Chrome and has most of the functionality that Chrome has. I use Chromium in place of Firefox when I’m in a screaming hurry, however, I’ve never really warmed to it as my browser of choice.
You can also install Chromium from the command line in the terminal:
sudo apt-get install chromium-browser
If you want, you can install Google Chrome from Google’s website. There is a .deb package and everything for easy installation. I don’t really know why anyone would bother, though. Having said that, I did read once that this guy installed Chrome to get the more colourful Chrome icon, rather than the ‘bluescale’ of the Chromium icon. To each their own, I suppose.
11. Make changes
Since last time, I’ve noticed that there have been a few changes made. The number of media players has been drastically reduced. Banshee has been left in, and VLC is back.
Whilst I don’t really like Banshee, it seems to talk to my personal music playing device rather nicely. I use VLC in a ‘surgical strike’ capacity with random music and video files. Just not all the time – Clementine is still my media player of choice.
I don’t need Xfburn as my PC doesn’t have an optical drive. I’ll remove that later.
Lastly, it appears that due to changes with the Twitter API, there is no decent dedicated Twitter client for Linux anywhere, ever. This is a pretty awful situation, but nothing I can do about that.
In addition, like last time, I’m going to install:
Gparted: Partition editor;
Vuze: Torrent client;
Skype: VoIP client;
Musescore: Music notation editor;
Calibre: E-book library manager;
Clementine: My music player of choice;
Bristol: Analogue synthesiser emulator.
Plugging this shopping list in looks like this:
sudo apt-get install calibre clementine gparted skype vuze monobristol musescore fluid-soundfont-gm fluidsynth timidity fluid-soundfont-gs pmidi
All good stuff.
12. Install codecs
You should have most of these by now. But you need more.
Run this in the terminal:
sudo apt-get install ubuntu-restricted-extras libxine1-ffmpeg gxine mencoder mpeg2dec vorbis-tools id3v2 mpg321 mpg123 libflac++6 ffmpeg totem-mozilla icedax tagtool easytag id3tool lame nautilus-script-audio-convert libmad0 libjpeg-progs flac faac faad sox ffmpeg2theora libmpeg2-4 uudeview flac libmpeg3-1 mpeg3-utils mpegdemux liba52-0.7.4-dev gstreamer0.10-ffmpeg gstreamer0.10-fluendo-mp3 gstreamer0.10-gnonlin gstreamer0.10-plugins-bad-multiverse gstreamer0.10-schroedinger gstreamer0.10-plugins-ugly gstreamer-dbus-media-service gstreamer-tools
Which should be everything that you need. Note that a lot of these are not free formats.
And hopefully, all these suggestions should help out with your shiny new installation of Linux Mint 15 (Olivia) XFCE. Enjoy!


Why doesn’t chromium browser support playing mp3 files?
Very simply, it’s licensing. Chromium is open source and your use of it doesn’t give you the right to play mp3, which is a proprietary format.
You can fix this here.
hi,
I have a hard time trying to figure out where the screensaver settings for xfce 15. Could you help me?
Good question. Unless you’ve done any menu modification, they’re in the Settings Manager, under “Personal” (top section).
If you have modified your menu, try searching for it under Settings -> Screensaver (scroll down to the Ss).
Good luck.
I can only see “Appearance, Desktop, File Manager, Panel, Preferred Apps, Window Manager, WIndow Manager Tweaks, Workspaces” under Personal? Is it located in one of them? Thank you for your help.
No it definitely should have been there. That’s weird, but easily fixed. Just enter:
sudo apt-get install xscreensaveralong with the other bits at step 8.
thank you so much! now the screensaver option appear. I think the one i have still use the gnome-screensaver because when i started/clicked the screensaver, it ask me to disable/turn-off the gnome daemon screensaver.
Yeah, you’ll have to uninstall that. Are you sure that you have Mint 15 XFCE? Mint 14 XFCE used gnome-screensaver.
yes. the “cat” result is
RELEASE=15
CODENAME=olivia
EDITION=”Xfce 32-bit”
DESCRIPTION=”Linux Mint 15 Olivia”.
Maybe they still use gnome-screensaver for 32-bit edition of Xfce 15.
Of course. I’d forgotten that 32-bit versions still existed. Good stuff.
I am a new Linux user and have tried multiple distros, and then I found LM15 xfce. I carefully chose it buy researching and this is definitely the flavor for me. Thanks to your post I have a lot of features that I would not have otherwise and I just wanted to be sure to tell you I appreciate it. I have also never used any of the online storage options EXCEPT google drive. I did sign up to all of the ones you have listed and I made sure to use the links that you gave to me I would like to point out though, dropbox only gave me 2GB exactly and SpiderOak only gave me 3GB. I have never used them before like I said and used your links. No biggie I was just looking forward to that 20GB 🙂 Anyways, glad I found your blog!
I must admit that I am slightly confused. Which one was it that you thought that you got 20GB as standard for?
But you do raise a valid point – I do need to go in there and mention what is provided as standard as they are not all the same. In fact they’re incredibly different.
SpiderOak: 2GB
Ubuntu One: 5GB
Dropbox 2GB
Copy: 15GB
Thanks for this – I’ll amend to make sure it’s clearer.
I’ve done a little more investigating, and it appears that I’m getting a lot less extra space from referrals to Dropbox than I am from the other three. I’m not sure what’s going on, but this does not sound all that correct. And, it’s not just because Dropbox only gives away 500 MB at a time.
For the record, I didn’t get any from referring you, dstoler, and I notice from your comment that you didn’t get any extra, either. Something fishy is going on.
I do apologize, doing so many new installs on my system at once I got “Copy” and SpiderOak confused. I certainly received 15 GB on Copy and I did get my extra 1GB for using your link on this blog on SpiderOak. Sorry about that. Thanks for clearing that up as well. I ahve a quick favor if you do not mind. I have screwed up many installs of multiple Linux distros by simply attempting to get the AMD (ATI whatever) drivers for my HD7950. What is the best way you think to go about doing this? If I can manage to properly install my amd drivers than I will most likely switch to Linux 100% very soon. For steam mostly, I run a TF2 community and also have a wordpress website. Thank you for all of the great info!
That’s great to hear, thanks. 🙂
I do need to ask – did you get your extra 500 MB for Dropbox? See my comment above yours.
Re the AMD/ATI drivers – I’m not the best person to ask, as I have used integrated video on my desktop for some time – although I’m planning a new desktop with an HD 7770. Apparently, the drivers for this are readily available an should install on an update. But is it easier with Nvidia cards, apparently.
I must check out your blog!
Referring to Dropbox- I may have clicked on the direct download link to get the .DEB file that you suggested but not sure. Possibly my fault on that one.
The HD7770 is a great value card. My wife has that in her Windows PC and some reason AMD offers separate drivers for that particular card. There are 7000 series drivers and below are 7770 drivers so not sure. They run about $125-$145 USD (a lot more in Australia I am aware!)
http://www.s4lservers.com (since you requested) I dont care much for spamming my site on others hard work to advertise. 🙂 We have had multiple Team Fortress 2 servers for almost a year and jsut last month we had to hang it up for a bit, but plan on returning real soon. We still have the website/forums and a strong community- up to 300 active members at one point. It is a really fun game and the only one I play. My wife plays as well and its our getaway to save money i.ew. keeps us from blowing money at the amll on junk etc
Sounds great – thanks for that.
Dikkii, I am sorry to bother you again but I am curious about additional software repositories compatible with LM15xfce. I found this page on Mints own website but really not sure what I can add or whatever. http://packages.linuxmint.com/list.php?release=Olivia are these all of the ones installed by default or what? If you do not know than I totally understand.
I think that’s just the main LM15 repository. Your PC accesses these through the Software Manager and the Update Manager, unless you’ve configured it (in Software Sources) to use a different mirror. Hope this helps.
Love your walkthrough – very clear and precise. Keep it up.
Thanks very much!
Hey, thanks for this. Just installed Olivia myself and it looks great. I’m having an issue with dropbox, though. I ran the commands I found in the relevant part of the dropbox website (https://www.dropbox.com/install?os=lnx) and all went well: created folder, ran daemon, signed in, icon in the panel appeared, sync started. I closed the terminal before the sync was complete and the icon disappeared from the panel. Also, dropbox does not appear in the menu. The folder’s still there. Should I run everything again?
I would do it all again.
I haven’t come across this situation and I recommended downloading the Ubuntu .deb package to make things easier, rather than running the commands on that page. Sorry, I’m not much help.
Hi Dikki, I’m a bit new to Linux,i’ve installed the new Linux Mint 15 Cinnamon(32 bit).Is there any command to enable or Install Dolby digital sound in Linux Mint. Appreciate your help.
Whoa! In at the deep end. I must admit, I don’t know much about this at all.
I’m presuming that you’re after the Dolby Digital audio codecs? I wish I knew more about this. The A52 decoder is open source and should have been installed with your codec pack. There are a couple of AC3 encoders and I think (?) it can’t hurt to install them both – Aften and/or ogmrip-ac3, I think and both should be available from the Software Manager.
If you’re planning on ripping DVDs, remember to keep an eye on the laws in your country and it you’re OK, Handbrake (also available in the Software Manager) should automatically install an AC3 encoder with it.
Good luck!
In the 6th item I scrolled down here. After writing this comment I’ll close the tab. PS: Never let anyone convince you that Linux has viruses. Either whoever is trying to convince you doesn’t have a clue about what a virus is, or just dropped windows yesterday’s night.
Ladies and gentlemen, the above comment is exactly the bulletproof attitude that caused me to write item 6. This sort of arrogance is why when someone actually does write a virus, the Linux community will be damaged very badly.
Read here for more information.
It’s worth scrolling down and reading the comments: It hammers my point home about Linuxers’ complacency.
For tip #4, how do you “move back” the files so email, documents, etc are where they are supposed to be? I can’t access my previous files through the home folder or documents folder, but I can when I select the “308 GB volume” that shows up on my desktop. My program settings seem to be set to default as if I installed a fresh install.
Good question, Matt. It sounds like you might have formatted whichever partition contains your /Home when you installed Mint. This will have wiped everything.
Before I ran the install of Linux Mint, I copied my old files on to a portable hard drive and when it came to moving them back, I just plugged in the hard drive and went to the folder on the portable hard drive and ctrl-x to grab the folder starting with Documents. Then went to my Home folder and went ctrl-v, making sure to select ‘merge’ on the way through.
I also did this with other folders, including Music, Videos, Calibre Library, and Desktop.
Hello ,
I am required for my network class to have a virtual machine with a Linux system and for it to be able to log into a Windows 2008 server r2. Running ADDS. WE have no internet in the lab apart from the wireless to our laptops. Would Mint be the easiest one to get to work on the ADDS without having to download any extra service packs. I was going to use Ubantu but required a service pack to get it to connect with the ADDS server and I could not seem to get that to work.
Thank you for your assistance
Hi Elizabeth.
I am not the best person to answer this query and for that I apologise. This blog is only going to deal with desktop-related issues for the home user. Sorry.
Add this one if you like netflix also.
http://www.webupd8.org/2013/08/pipelight-use-silverlight-in-your-linux.html
Hi !
Thank for your post n°12, it’s help me a lot for retrieve my thumbnails of my sound files. It is very simple when we know the trick 🙂
(and sorry for my english…)